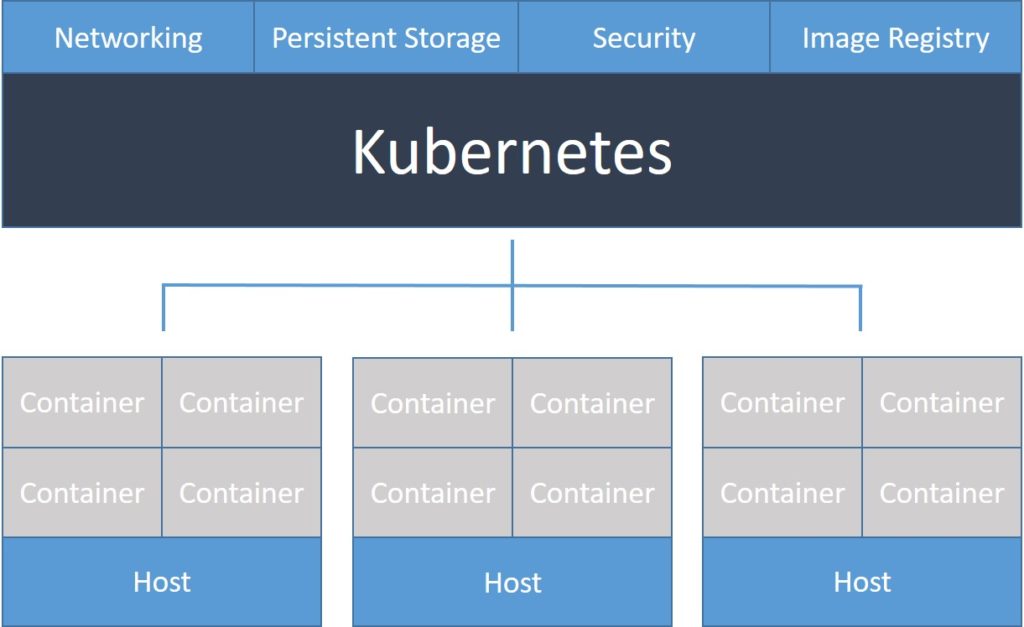
Kubernetes provides our team with:
- Service discovery and load balancing Kubernetes allowed us to expose a container using the DNS name or using their own IP address. If traffic to a container was high, Kubernetes allowed us to load balance and distribute the network traffic so that the deployment was stable.
- Storage orchestration Kubernetes allowed our team to automatically mount a storage system of our choice, such as local storages, public cloud providers, and more.
- Automated rollouts and rollbacks: Our team could describe the desired state for our deployed containers using Kubernetes, and change the actual state to the desired state at a controlled rate.
- Automatic bin packing: We provided Kubernetes with a cluster of nodes to use to run containerized tasks. Our team was incharge of telling Kubernetes how much CPU and memory (RAM) each container needs. Kubernetes fit containers onto our nodes to make the best use of our resources.
- Self-healing Kubernetes restarted containers that failed, replaced containers, killed containers that didn’t respond to our user-defined health check, and did not advertise them to clients until they were ready to serve.
- Secret and configuration management Kubernetes allowed us to store and manage sensitive information, such as passwords, OAuth tokens, and Secure Socket Shell (SSH) keys. We could deploy and update secrets as well as application configuration without rebuilding our container images, and without exposing secrets in our stack configuration.

Deploying process of a containerized web application used by our team
Team RVGS packages web applications in Docker container images, and runs that container image on a Google Kubernetes Engine (GKE) cluster. Then, our team deploys the web application as a load-balanced set of replicas that scale to the needs of our users.
Objectives
Package a sample web application into a Docker image.
Upload the Docker image to the Container Registry.
Create a GKE cluster.
Deploy the sample app to the cluster.
Manage auto scaling for the deployment.
Expose the sample app to the internet.
Deploy a new version of the sample app.
Before we began:
Our team took the following steps to enable the Kubernetes Engine Application Programming Interface (API):
Visited the Kubernetes Engine page in the Google Cloud Console.
Created or selected a project.
Waited for the API and related services to be enabled.
Made sure that billing was enabled for our Cloud project.
Option A: Use Cloud Shell
Option B: Use command-line tools locally
Our team preferred to follow this tutorial on our workstation, followed these steps to install the necessary tools.
Installed the Cloud Software Development kit (SDK), which included the gcloud command-line tool.
Using the gcloud command line tool, installed the Kubernetes command-line tool. Kubectl was used to communicate with Kubernetes, which was the cluster orchestration system of GKE clusters:
gcloud components installed kubectl
Installed Docker Community Edition (CE) on our workstation. Our team used this to build a container image for the application.
Installed the Git source control tool to fetch the sample application from GitHub.
Building the container image:
Our team deployed a sample web application called hello-app, a web server written in Go that responded to all requests with the message Hello, World! on port 8080.GKE acceptet Docker images as the application deployment format. Before deploying hello-app to GKE, we packaged the hello-app source code as a Docker image.
To build a Docker image, we needed source code and a Dockerfile. The Dockerfile contained instructions on how the image was built.
Downloaded the hello-app source code and Dockerfile by running the following commands:
git clone https://github.com/GoogleCloudPlatform/kubernetes-engine-samples
cd kubernetes-engine-samples/hello-appSet the PROJECT_ID environment variable to our Google Cloud project ID (PROJECT_ID). The PROJECT_ID variable associated the container image with our project’s Container Registry.
export PROJECT_ID=PROJECT_IDConfirmed that the PROJECT_ID environment variable had the correct value:
echo $PROJECT_IDBuilt and tagged the Docker image for hello-app:
docker build -t gcr.io/${PROJECT_ID}/hello-app:v1 .
Pushing the Docker image to Container Registry:
Team RV Global Solutions uploaded the container image to a registry so that our GKE cluster could download and run the container image. In Google Cloud, Container Registry was available by default.
- Enabled the Container Registry API for the Google Cloud project our team was working on:
gcloud services enable containerregistry.googleapis.com
- Configured the Docker command-line tool to authenticate to Container Registry:
gcloud auth configure-docker
- Pushed the Docker image that we built to Container Registry:
docker push gcr.io/${PROJECT_ID}/hello-app:v1

Creating a GKE cluster:
Now that the Docker image was stored in the Container Registry, we created a GKE cluster to run hello-app. The GKE cluster consisted of a pool of Compute Engine VM instances running Kubernetes, the open source cluster orchestration system that powered GKE.
- Set our project ID option for the gcloud tool:gcloud config set project $PROJECT_ID
- Set our zone or region. Depending on the mode of operation that we chose to use in GKE, our team specified a default zone or region. While using Standard mode, our cluster was zonal, so we set our default compute zone. While using Autopilot mode, our cluster was regional, so we set our default computer region. Choose the zone or region that was closest to us.
- Standard cluster, such as us-west1-a: gcloud config set compute/zone
- Autopilot cluster, such as us-west1: gcloud config set compute/region
- Created a cluster named hello-cluster:
- Standard cluster:gcloud container clusters create hello-cluster
- Autopilot cluster:gcloud container clusters create-auto hello-cluster
- It took a few minutes for our GKE cluster to be created and health-checked.
- After the command completed, ran the following command to see the cluster’s three Nodes: kubectl get nodes

Deploying the sample app to GKE:
Our team was now ready to deploy the Docker image we built to our GKE cluster.
Kubernetes represented applications as Pods, which were scalable units holding one or more containers. The Pod was the smallest deployable unit in Kubernetes. Usually, we deployed Pods as a set of replicas that scaled and distributed together across our cluster. One way to deploy a set of replicas was through a Kubernetes Deployment.
Our team created a Kubernetes Deployment to run hello-app on our cluster. This Deployment had replicas (Pods). One Deployment Pod contained only one container: the hello-app Docker image. We also created a Horizontal Pod Autoscaler resource that scaled the number of Pods from 3 to a number between 1 and 5, based on Central Processing Unit (CPU) load.
Ensured that we were connected to our GKE cluster: gcloud container clusters get-credentials hello-cluster –zone COMPUTE_ZONE
Created a Kubernetes Deployment for our hello-app Docker image: kubectl create deployment hello-app –image=gcr.io/${PROJECT_ID}/hello-app:v1
Set the baseline number of Deployment replicas to 3: kubectl scale deployment hello-app –replicas=3
Created a HorizontalPodAutoscaler resource for our Deployment: kubectl autoscale deployment hello-app –cpu-percent=80 –min=1 –max=5
To see the Pods created, ran the following command: kubectl get pods
Exposing the sample app to the internet
In this phase our team exposed the hello-app Deployment to the internet using a Service of type LoadBalancer.
Used the kubectl expose command to generate a Kubernetes Service for the hello-app deployment: kubectl expose deployment hello-app –name=hello-app-service –type=LoadBalancer –port 80 –target-port 8080. Here, the –port flag specifies the port number configured on the Load Balancer, and the –target-port flag specifies the port number that the hello-app container is listening on.
Ran the following command to get the Service details for hello-app-service: kubectl get service
